If you’ve ever looked at a cozy scarf or a handmade blanket and thought, “I wish I could make that,” this is your sign.
Learning how to crochet isn’t hard — and it’s one of the most relaxing, creative skills you can pick up.
Plus, you don’t need fancy tools or expensive materials to start. All you need is a hook, some yarn, and a little bit of patience.
In this guide, we’ll walk you through how to crochet step by step.
Whether you want to create simple dishcloths or beautiful home decor, everything starts with the basics. So, let’s get into it.
What is Crochet?
Before we get into how to crochet, let’s talk about what crochet actually is.
Crochet is a needlework technique that involves creating loops with a hook and yarn. Unlike knitting, which uses two needles, crochet is done with a single hook — which makes it easier for many beginners to learn.
The word “crochet” comes from the French word for “hook.” And once you get the hang of it, you’ll realize just how versatile this little tool can be. You can make clothing, toys, accessories, blankets, and more — all with a hook and some yarn.
How to Dress Like a Stylish Woman
How to Build the Perfect Capsule Wardrobe
Why Learn How to Crochet?
There’s something deeply satisfying about making something with your own hands. Crocheting is not just a fun hobby, it’s also known to help reduce stress, improve focus, and give your mind a break from screens. Plus, if you enjoy making gifts, crochet is perfect for that.
Once you learn how to crochet, you’ll always have a creative outlet. You’ll also be able to make thoughtful, handmade items for your family and friends — or even sell your creations if that’s something you’re into.
What You Need to Begin
Learning how to crochet doesn’t require a lot. Here’s a short list of what you’ll need:
- A crochet hook – Start with a size 5.0mm (H-8) hook. It’s great for beginners.
- Yarn – Medium weight yarn (also called worsted weight or 4-ply yarn) is ideal.
- Scissors – For trimming ends.
- Yarn needle – For weaving in the ends after you finish your project.
- Stitch markers (optional) – Helpful for marking important points in your work.
Once you have these, you’re ready to begin your journey into how to crochet.
Understanding Yarn Labels and Hook Sizes
Yarn comes with a label that shows you the weight, recommended hook size, and care instructions. For beginners, it’s best to choose a light color yarn so you can see your stitches clearly. Avoid dark yarns at first — they make learning how to crochet harder than it needs to be.
As for hook sizes, they are usually listed in millimeters. The bigger the number, the larger the hook. The hook size you use will depend on the weight of the yarn and the pattern you’re working on.
How to Choose the Right Yarn and Hook
When learning how to crochet, it’s important not to overwhelm yourself with too many options. Start simple. Pick one ball of medium-weight yarn in a light color and a size H-8 (5mm) hook. This combo makes it easier to see what you’re doing and helps you get comfortable with the basic motions.
Once you’re more confident, you can explore different textures and colors. But for now, stick with soft acrylic yarn that glides smoothly through your fingers.
Basic Crochet Terms You Should Know
Let’s go over some of the basic words and abbreviations you’ll run into when learning how to crochet:
- Chain (ch): The foundation of most crochet projects. It’s the first stitch you’ll learn.
- Single Crochet (sc): A basic stitch that creates a tight, dense fabric.
- Double Crochet (dc): A taller stitch that creates a looser, more open look.
- Slip Stitch (sl st): Used to join stitches or move across stitches without adding height.
You don’t need to memorize everything right away. As you practice how to crochet, these terms will start to make sense naturally.
How to Hold the Yarn and Hook
There’s no one right way to hold your hook and yarn — it’s all about comfort. Some people hold the hook like a pencil, while others prefer a knife grip. Try both and see which feels more natural to you.
The same goes for how you hold the yarn. The goal is to have a steady tension — not too tight, not too loose. Don’t stress if it feels awkward at first. Like anything else, learning how to crochet takes practice.
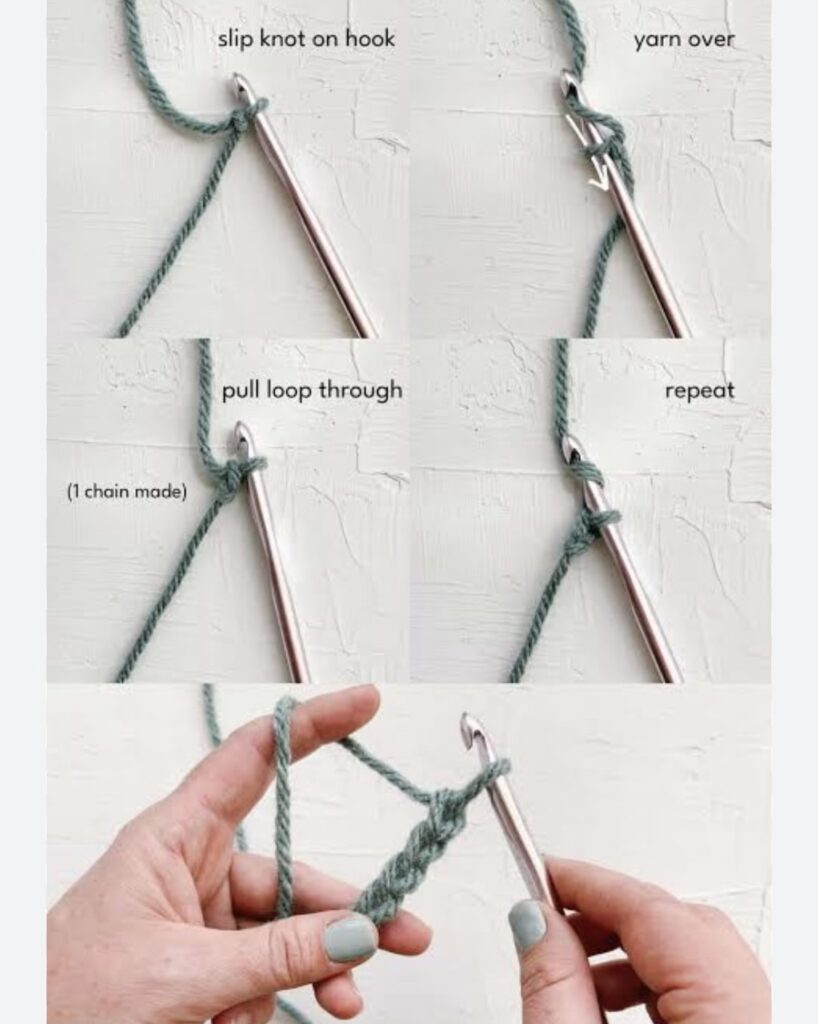
Let’s Make Your First Chain
Now it’s time to actually start. Here’s how to crochet your first chain:
- Hold the hook in your dominant hand and create a slip knot with the yarn.
- Slide the loop onto your hook and tighten it slightly — not too tight.
- Use the hook to grab the yarn and pull it through the loop on your hook. That’s one chain!
- Repeat the motion until you have a row of chains. Try to keep them even in size.
That’s it! You’ve just taken the first real step into how to crochet.
Common Mistakes Beginners Make
Don’t worry if your chains are uneven or your yarn feels too tight. Everyone starts that way. The most common mistakes when learning how to crochet are:
- Pulling the yarn too tight
- Using the wrong hook size
- Skipping stitches without realizing it
- Getting frustrated too quickly
The fix? Keep going. The more you practice, the easier it becomes. You’ll go from awkward loops to clean, beautiful stitches before you know it.
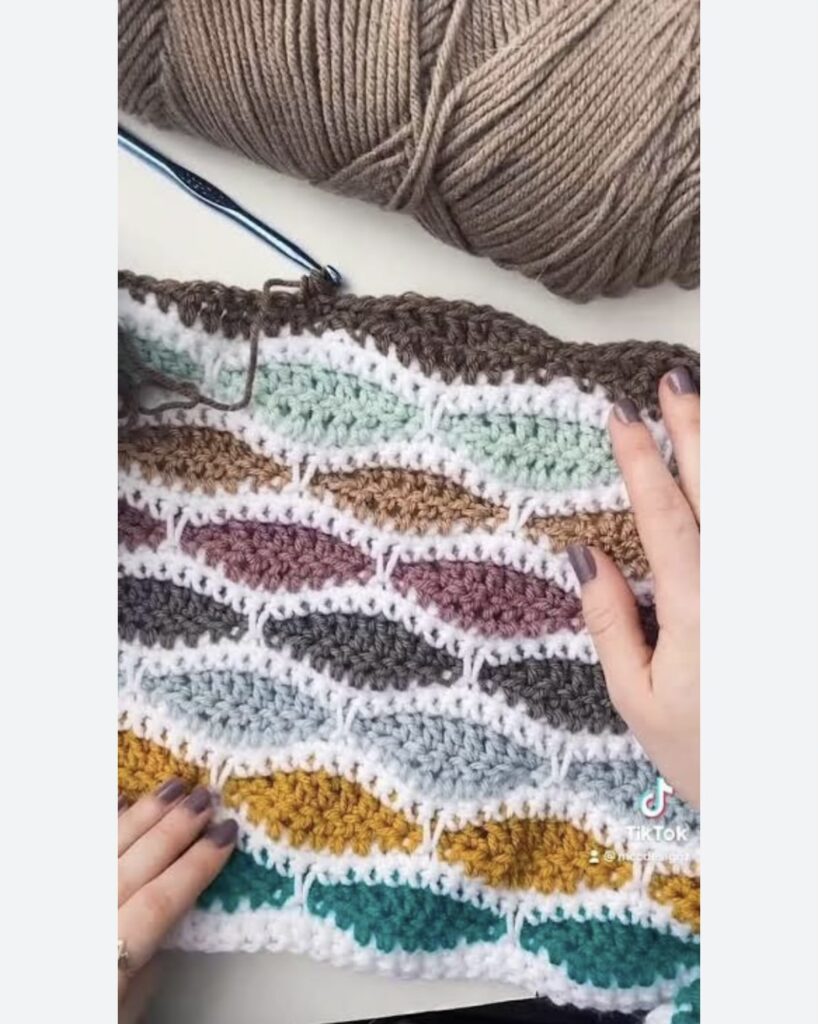
How to Crochet Basic Stitches
Now that you’ve mastered your first chain, it’s time to step it up a bit. Learning how to crochet means getting familiar with the most important building blocks: stitches. These are the loops and pulls that bring your projects to life.
We’ll start with two of the most common and beginner-friendly stitches: the single crochet and the double crochet. These will form the base of almost everything you make when you’re just getting started.
How to Crochet a Single Crochet (sc)
Let’s go step-by-step so you don’t feel overwhelmed. This is how to crochet a basic single crochet stitch:
- Start with a chain row — maybe about 10 to 15 chains.
- Insert your hook into the second chain from the hook (not the first!).
- Yarn over — that means wrap the yarn over your hook from back to front.
- Pull the yarn through the chain. Now you have two loops on your hook.
- Yarn over again and pull through both loops. That’s your single crochet!
Repeat this process across the row. When you reach the end, you’ll see a short, tight line of stitches forming. It might look a little lumpy at first, but that’s completely normal.
How to Crochet a Double Crochet (dc)
The double crochet stitch is taller and creates a looser fabric. It’s perfect for scarves, shawls, and anything you want to feel soft and drapey. Here’s how to crochet it:
- Chain about 12 to 15 stitches to start.
- Yarn over once before inserting your hook into the third chain from the hook.
- Insert your hook, yarn over again, and pull up a loop. You’ll have three loops on your hook.
- Yarn over and pull through the first two loops. Now you have two loops left.
- Yarn over again and pull through the last two loops. You’ve just made a double crochet stitch!
Keep going until you finish the row. When you’re learning how to crochet, double crochet stitches will become one of your favorite go-to options because they’re quick and satisfying to make.
Understanding Turning Chains
Once you finish one row, you’ll need to get to the next row — that’s where the turning chain comes in. It’s just a few extra chains that help you start the next row at the right height.
For single crochet, chain 1 at the end of a row before you turn. For double crochet, chain 2 or 3. It may feel awkward at first, but once you get into a rhythm, it will feel natural.
How to Read a Simple Pattern
Learning how to crochet also means learning how to read patterns. It may look like a secret code at first, but here’s the key: patterns are full of short abbreviations. They help you work faster and follow along more easily.
Here are a few common ones:
- ch – chain
- sc – single crochet
- dc – double crochet
- sl st – slip stitch
- rep – repeat
- st(s) – stitch(es)
Let’s say a pattern says: “Ch 15, sc in 2nd ch from hook, sc across.” That just means you start with 15 chains and do a single crochet in each chain after the second one. Simple, right?
How to Count Your Stitches and Rows
This part can feel tricky in the beginning, but it gets easier with practice. Here’s how to crochet and keep track at the same time:
- Each “V” shape in the fabric is a stitch.
- Each horizontal row you complete counts as one row.
- If your stitch count changes by accident, your edges will start to look slanted — that’s a clue to go back and check.
You can also use stitch markers or even safety pins to mark the first or last stitch of each row if you find yourself losing track.
Fixing Mistakes While You Crochet
Don’t worry if you mess up. Everyone does. And guess what? Undoing a mistake is easy once you know how to crochet the right way. If you notice something off, just gently pull the yarn backward until you reach the error. That’s called “frogging” — as in, “rip it, rip it.”
Here’s what to do for common issues:
- Too tight stitches? Loosen your tension and hold your yarn more gently.
- Too loose? Wrap the yarn a bit firmer around your fingers.
- Skipped a stitch? Rip back to that point and redo it.
When learning how to crochet, fixing mistakes is part of the process. It helps you become more confident and understand the rhythm of the craft.
How to Keep Your Edges Straight
Uneven edges are one of the biggest issues beginners face. One side starts looking like stairs, while the other is jagged. But don’t worry — it’s fixable.
Here’s how to crochet and keep everything straight:
- Always make the correct number of turning chains.
- Don’t skip the last stitch of the row.
- Use stitch markers at the ends of rows for guidance.
Once you do this a few times, your rows will start lining up better. Straight edges are a sign that your skills are improving — and trust me, you’ll see the difference.
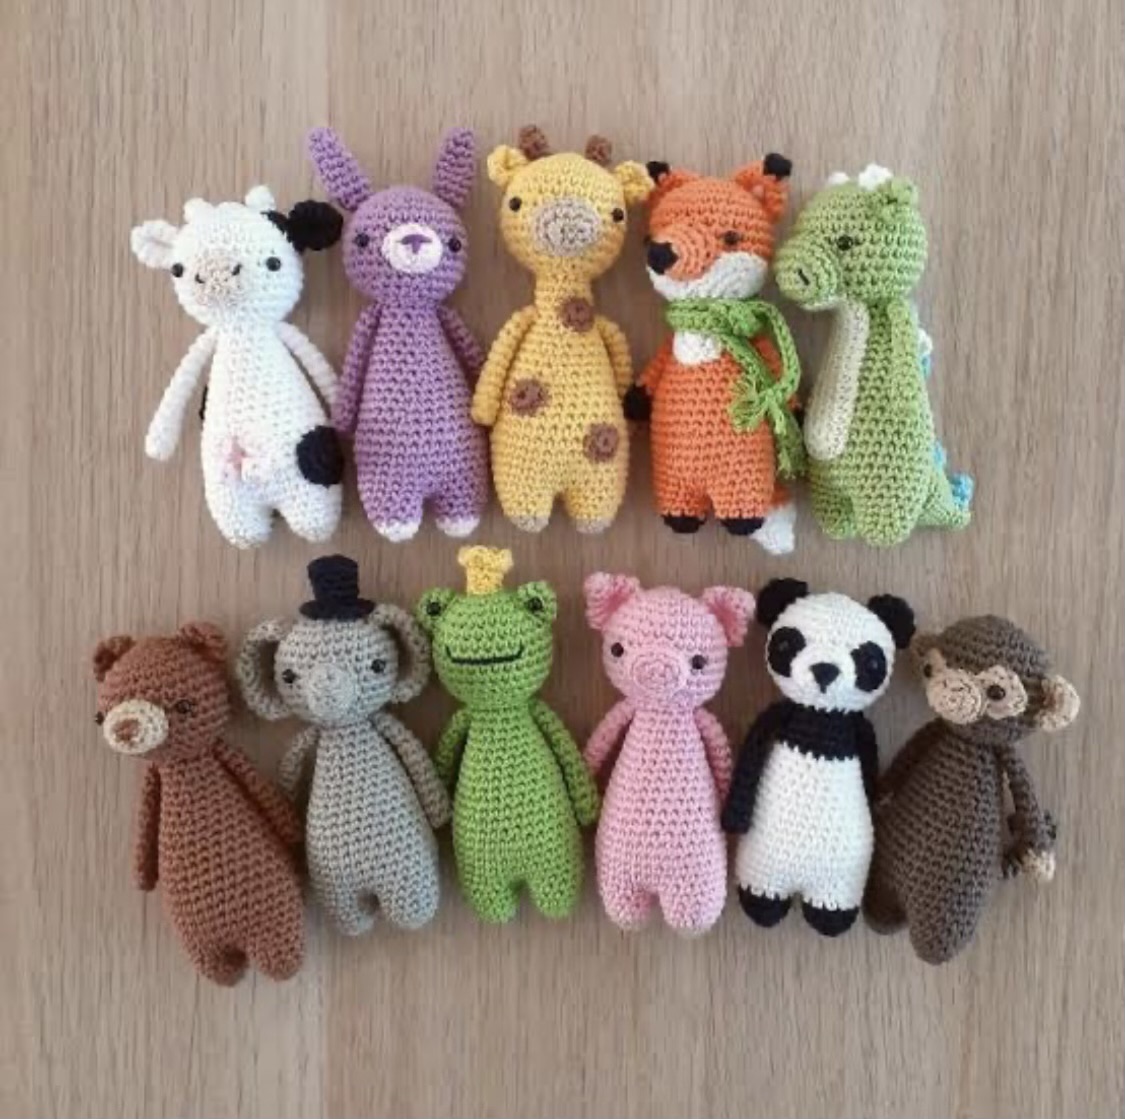
First Simple Project Ideas

Now that you know how to crochet some basic stitches, you can actually make things! Here are a few super easy project ideas to try right now:
- Practice square – Just rows of single crochet. Try to keep it even.
- Mini scarf – A long strip made with double crochet. Great for learning row repetition.
- Dishcloth – A square using any stitch. Functional and cute!
Don’t overthink your first project. The main goal is to get used to how to crochet and enjoy the process. Your early work may not be perfect, but it’s the beginning of something amazing.
How to Crochet Basic Stitches
Now that you’ve mastered your first chain, it’s time to step it up a bit. Learning how to crochet means getting familiar with the most important building blocks: stitches. These are the loops and pulls that bring your projects to life.
We’ll start with two of the most common and beginner-friendly stitches: the single crochet and the double crochet. These will form the base of almost everything you make when you’re just getting started.
How to Crochet a Single Crochet (sc)
Let’s go step-by-step so you don’t feel overwhelmed. This is how to crochet a basic single crochet stitch:
- Start with a chain row — maybe about 10 to 15 chains.
- Insert your hook into the second chain from the hook (not the first!).
- Yarn over — that means wrap the yarn over your hook from back to front.
- Pull the yarn through the chain. Now you have two loops on your hook.
- Yarn over again and pull through both loops. That’s your single crochet!
Repeat this process across the row. When you reach the end, you’ll see a short, tight line of stitches forming. It might look a little lumpy at first, but that’s completely normal.
How to Crochet a Double Crochet (dc)
The double crochet stitch is taller and creates a looser fabric. It’s perfect for scarves, shawls, and anything you want to feel soft and drapey. Here’s how to crochet it:
- Chain about 12 to 15 stitches to start.
- Yarn over once before inserting your hook into the third chain from the hook.
- Insert your hook, yarn over again, and pull up a loop. You’ll have three loops on your hook.
- Yarn over and pull through the first two loops. Now you have two loops left.
- Yarn over again and pull through the last two loops. You’ve just made a double crochet stitch!
Keep going until you finish the row. When you’re learning how to crochet, double crochet stitches will become one of your favorite go-to options because they’re quick and satisfying to make.
Understanding Turning Chains
Once you finish one row, you’ll need to get to the next row — that’s where the turning chain comes in. It’s just a few extra chains that help you start the next row at the right height.
For single crochet, chain 1 at the end of a row before you turn. For double crochet, chain 2 or 3. It may feel awkward at first, but once you get into a rhythm, it will feel natural.
How to Read a Simple Pattern
Learning how to crochet also means learning how to read patterns. It may look like a secret code at first, but here’s the key: patterns are full of short abbreviations. They help you work faster and follow along more easily.
Here are a few common ones:
- ch – chain
- sc – single crochet
- dc – double crochet
- sl st – slip stitch
- rep – repeat
- st(s) – stitch(es)
Let’s say a pattern says: “Ch 15, sc in 2nd ch from hook, sc across.” That just means you start with 15 chains and do a single crochet in each chain after the second one. Simple, right?
How to Count Your Stitches and Rows
This part can feel tricky in the beginning, but it gets easier with practice. Here’s how to crochet and keep track at the same time:
- Each “V” shape in the fabric is a stitch.
- Each horizontal row you complete counts as one row.
- If your stitch count changes by accident, your edges will start to look slanted — that’s a clue to go back and check.
You can also use stitch markers or even safety pins to mark the first or last stitch of each row if you find yourself losing track.
Fixing Mistakes While You Crochet
Don’t worry if you mess up. Everyone does. And guess what? Undoing a mistake is easy once you know how to crochet the right way. If you notice something off, just gently pull the yarn backward until you reach the error. That’s called “frogging” — as in, “rip it, rip it.”
Here’s what to do for common issues:
- Too tight stitches? Loosen your tension and hold your yarn more gently.
- Too loose? Wrap the yarn a bit firmer around your fingers.
- Skipped a stitch? Rip back to that point and redo it.
When learning how to crochet, fixing mistakes is part of the process. It helps you become more confident and understand the rhythm of the craft.
How to Keep Your Edges Straight
Uneven edges are one of the biggest issues beginners face. One side starts looking like stairs, while the other is jagged. But don’t worry — it’s fixable.
Here’s how to crochet and keep everything straight:
- Always make the correct number of turning chains.
- Don’t skip the last stitch of the row.
- Use stitch markers at the ends of rows for guidance.
Once you do this a few times, your rows will start lining up better. Straight edges are a sign that your skills are improving — and trust me, you’ll see the difference.
First Simple Project Ideas
Now that you know how to crochet some basic stitches, you can actually make things! Here are a few super easy project ideas to try right now:
- Practice square – Just rows of single crochet. Try to keep it even.
- Mini scarf – A long strip made with double crochet. Great for learning row repetition.
- Dishcloth – A square using any stitch. Functional and cute!
Don’t overthink your first project. The main goal is to get used to how to crochet and enjoy the process. Your early work may not be perfect, but it’s the beginning of something amazing.